Setting Up a Production-Mirror Dev Environment on AWS
Our app launched entirely on production infrastructure — one EC2, one RDS, one everything. This post walks through how I created a fully isolated dev environment that mirrors prod exactly: separate compute, separate database, separate storage, and a CI/CD pipeline that deploys to dev on every push to the dev branch.
The Problem
When you build fast, everything ends up in production. We were no different — the entire stack ran on a single environment. Any feature branch pushed directly tomainwas one mistake away from breaking live users.
The fix is straightforward in principle: create a parallel environment that is identical to production but completely isolated. The hard part is doing it without skipping corners — especially the database.
The database is the most critical reason to keep environments separate. A bad migration, a seed script that truncates rows, or a test that corrupts data on a shared RDS instance hits real users. Never share a database between dev and prod.
Architecture
The target state — two fully isolated stacks inside the same VPC:
VPC: myapp-vpc (10.0.0.0/16)
│
├── PRODUCTION
│   ├── EC2:  myapp-ec2          (t3.micro, public subnet)
│   ├── RDS:  myapp-db           (PostgreSQL 15, private subnet)
│   ├── S3:   myapp-uploads-prod
│   ├── ECR:  myapp-backend
│   └── Amplify → yourapp.com       (main branch)
│
└── DEV
    ├── EC2:  myapp-ec2-dev       (t3.micro, public subnet)
    ├── RDS:  myapp-db-dev        (PostgreSQL 17.9, private subnet)
    ├── S3:   myapp-uploads-dev
    ├── ECR:  myapp-backend-dev
    └── Amplify → dev.yourapp.com   (dev branch)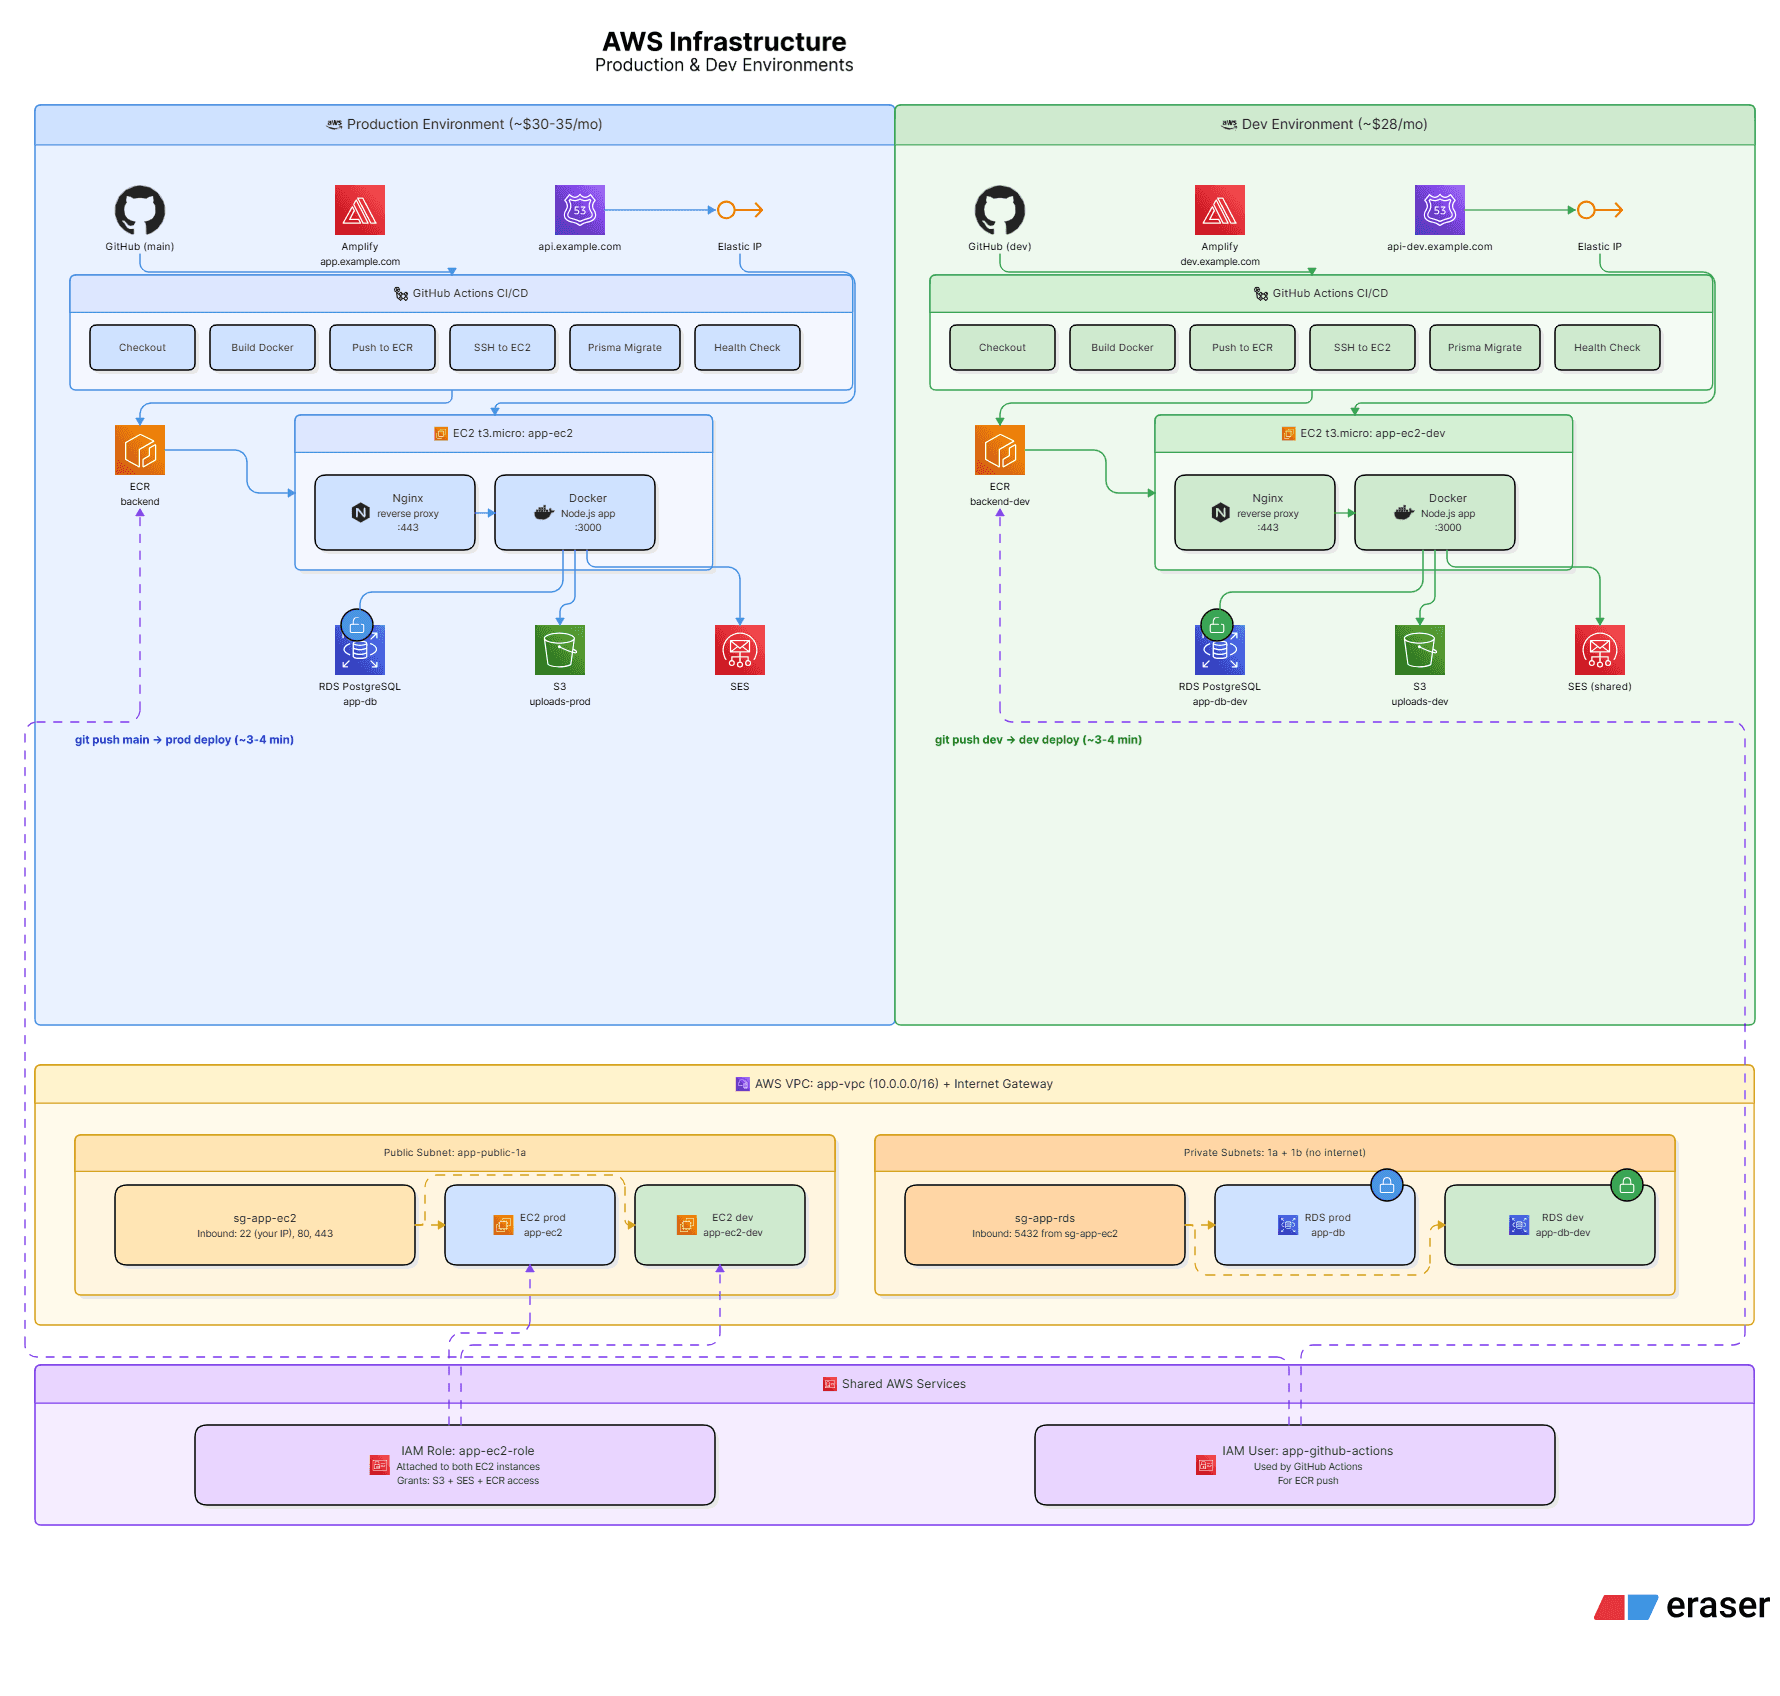
Both environments share the same VPC, security groups, IAM role, and key pair. Everything else is a separate resource. Cost overhead: ~$27/month for the dev EC2 + RDS.
Step 1 — Secrets Manager
Production already used AWS Secrets Manager for the RDS password and JWT secrets. Dev gets its own parallel set under a myapp/dev/ prefix:
aws secretsmanager create-secret `
  --name "myapp/dev/db/password" `
  --secret-string "YOUR_STRONG_DEV_DB_PASSWORD" `
  --region us-east-1

aws secretsmanager create-secret `
  --name "myapp/dev/jwt/secret" `
  --secret-string "YOUR_JWT_SECRET_MIN_32_CHARS" `
  --region us-east-1

aws secretsmanager create-secret `
  --name "myapp/dev/jwt/access" `
  --secret-string "YOUR_JWT_ACCESS_SECRET_MIN_32_CHARS" `
  --region us-east-1

aws secretsmanager create-secret `
  --name "myapp/dev/jwt/refresh" `
  --secret-string "YOUR_JWT_REFRESH_SECRET_MIN_32_CHARS" `
--region us-east-1Secrets Manager is used as the source of truth. The actual values are manually placed in/app/.envon the EC2 instance — the app reads from the env file at runtime, not from the SDK.
Step 2 — RDS PostgreSQL (Dev)
Create a dev RDS instance in the same VPC and private subnets as prod, reusing the existing subnet group and security group:
aws rds create-db-instance \
  --db-instance-identifier myapp-db-dev \
  --db-instance-class db.t3.micro \
  --engine postgres \
  --engine-version 17.9 \
  --master-username postgres \
  --master-user-password YOUR_DEV_DB_PASSWORD \
  --db-name myapp \
  --allocated-storage 20 \
  --storage-type gp2 \
  --db-subnet-group-name myapp-db-subnet-group \
  --vpc-security-group-ids sg-XXXXXXXX \
  --no-publicly-accessible \
  --backup-retention-period 3 \
  --no-multi-az \
  --tags Key=Environment,Value=dev Key=Project,Value=myapp \
  --region us-east-1
I chose PostgreSQL 17.9 for dev (prod was on 15) to test compatibility ahead of a planned prod upgrade. Prisma 5.7 supports PG 9.6 through 17 — no schema changes required.
Wait for the instance to become available (~8 minutes):
aws rds describe-db-instances \
  --db-instance-identifier myapp-db-dev \
  --query "DBInstances[0].{Status:DBInstanceStatus,Endpoint:Endpoint.Address}" \
  --output table --region us-east-1
Step 3 — S3 Bucket + ECR Repository
Create the dev S3 bucket, lock it down, and set CORS for the dev frontend domain:
# Create bucket
aws s3api create-bucket \
  --bucket myapp-uploads-dev \
  --region us-east-1

# Block all public access
aws s3api put-public-access-block \
  --bucket myapp-uploads-dev \
  --public-access-block-configuration "BlockPublicAcls=true,IgnorePublicAcls=true,BlockPublicPolicy=true,RestrictPublicBuckets=true"

# CORS — dev frontend only, no localhost
aws s3api put-bucket-cors --bucket myapp-uploads-dev \
  --cors-configuration '{"CORSRules":[{"AllowedOrigins":["https://dev.yourapp.com"],"AllowedMethods":["GET","PUT","POST","DELETE"],"AllowedHeaders":["*"],"MaxAgeSeconds":3000}]}'
Create the dev ECR repository with a lifecycle policy to keep storage lean:
aws ecr create-repository \
  --repository-name myapp-backend-dev \
  --region us-east-1

aws ecr put-lifecycle-policy \
  --repository-name myapp-backend-dev \
  --lifecycle-policy-text '{"rules":[{"rulePriority":1,"description":"Keep last 5 images","selection":{"tagStatus":"any","countType":"imageCountMoreThan","countNumber":5},"action":{"type":"expire"}}]}' \
  --region us-east-1
Step 4 — Dev EC2 Instance
Launch a dev EC2 reusing the same key pair, IAM instance profile, and security groups as prod:
aws ec2 run-instances \
  --image-id ami-XXXXXXXX \
  --instance-type t3.micro \
  --key-name myapp-ec2-prod \
  --security-group-ids sg-XXXXXXXX \
  --subnet-id subnet-XXXXXXXX \
  --iam-instance-profile Name=myapp-ec2-profile \
  --tag-specifications 'ResourceType=instance,Tags=[{Key=Name,Value=myapp-ec2-dev},{Key=Environment,Value=dev}]' \
  --region us-east-1
Allocate and associate a dedicated Elastic IP for the dev instance:
# Allocate
ALLOC_ID=$(aws ec2 allocate-address --domain vpc --query AllocationId --output text)

# Associate
aws ec2 associate-address \
  --instance-id i-XXXXXXXXXXXXXXXXX \
  --allocation-id $ALLOC_ID
Step 5 — Server Setup on Dev EC2
SSH into the dev EC2 and run the server setup in order:
# 1. Install Docker, Nginx, Certbot
sudo dnf update -y
sudo dnf install -y docker nginx certbot python3-certbot-nginx

# 2. Start services
sudo systemctl start docker && sudo systemctl enable docker
sudo systemctl start nginx && sudo systemctl enable nginx
sudo usermod -aG docker ec2-user

# Log out and back in for docker group to take effect
Write the Nginx config (HTTP only — Certbot upgrades it to HTTPS):
# /etc/nginx/conf.d/myapp-dev.conf
server {
    listen 80;
    server_name api-dev.yourapp.com;

    location / {
        proxy_pass http://localhost:3000;
        proxy_http_version 1.1;
        proxy_set_header Upgrade $http_upgrade;
        proxy_set_header Connection 'upgrade';
        proxy_set_header Host $host;
        proxy_set_header X-Real-IP $remote_addr;
        proxy_set_header X-Forwarded-For $proxy_add_x_forwarded_for;
        proxy_set_header X-Forwarded-Proto $scheme;
    }
}
Add the DNS A record for api-dev.yourapp.com pointing to the dev Elastic IP, wait a few minutes, then run Certbot:
sudo certbot --nginx -d api-dev.yourapp.comCertbot rewrites the Nginx config automatically — adds SSL directives, installs the certificate, and sets up the HTTP-to-HTTPS redirect. Verify it worked:
curl -I https://api-dev.yourapp.com
# HTTP/1.1 502 Bad Gateway ← correct, no container running yetA 502 at this stage is the right answer. Nginx is up and SSL is working — the 502 just means there is no Docker container on port 3000 yet. The app deploy will fix that.
Step 6 — /app/.env on Dev EC2
Create the environment file the Docker container reads at startup:
sudo mkdir -p /app
sudo tee /app/.env > /dev/null << 'EOF'
NODE_ENV=development
PORT=3000
DATABASE_URL=postgresql://postgres:PASSWORD@myapp-db-dev.XXXX.us-east-1.rds.amazonaws.com:5432/myapp
JWT_SECRET=...
JWT_ACCESS_SECRET=...
JWT_REFRESH_SECRET=...
AWS_REGION=us-east-1
AWS_S3_BUCKET_NAME=myapp-uploads-dev
AWS_S3_CDN_URL=https://myapp-uploads-dev.s3.amazonaws.com
FRONTEND_URL=https://dev.yourapp.com
EOF

sudo chmod 644 /app/.env # Docker needs read accesschmod 600 feels more secure but breaks Docker's--env-file flag, which runs as a non-root user. Use 644 — the EC2 is already locked down at the network level.
Step 7 — GitHub Actions Deploy Workflow
The dev deploy workflow mirrors the prod workflow exactly — the only differences are the ECR repository name, the SSH target host, and the trigger branch:
# .github/workflows/deploy-dev.yml
name: Deploy to Dev

on:
  push:
    branches: [dev]

env:
  AWS_REGION: us-east-1
  ECR_REPOSITORY: myapp-backend-dev
  IMAGE_TAG: ${{ github.sha }}

jobs:
  deploy:
    runs-on: ubuntu-latest
    steps:
      - uses: actions/checkout@v4

      - name: Configure AWS credentials
        uses: aws-actions/configure-aws-credentials@v4
        with:
          aws-access-key-id: ${{ secrets.AWS_ACCESS_KEY_ID }}
          aws-secret-access-key: ${{ secrets.AWS_SECRET_ACCESS_KEY }}
          aws-region: ${{ env.AWS_REGION }}

      - name: Login to ECR
        id: login-ecr
        uses: aws-actions/amazon-ecr-login@v2

      - name: Build and push Docker image
        env:
          ECR_REGISTRY: ${{ steps.login-ecr.outputs.registry }}
        run: |
          docker build -t $ECR_REGISTRY/${{ env.ECR_REPOSITORY }}:${{ env.IMAGE_TAG }} .
          docker push $ECR_REGISTRY/${{ env.ECR_REPOSITORY }}:${{ env.IMAGE_TAG }}

      - name: Deploy to Dev EC2
        uses: appleboy/ssh-action@v1
        with:
          host: ${{ secrets.DEV_EC2_HOST }}
          username: ec2-user
          key: ${{ secrets.EC2_SSH_KEY }}
          envs: IMAGE_TAG,AWS_REGION
          script: |
            set -e
            ECR_URI=${{ secrets.AWS_ACCOUNT_ID }}.dkr.ecr.$AWS_REGION.amazonaws.com/myapp-backend-dev:$IMAGE_TAG

            aws ecr get-login-password --region $AWS_REGION | \
              docker login --username AWS --password-stdin \
              ${{ secrets.AWS_ACCOUNT_ID }}.dkr.ecr.$AWS_REGION.amazonaws.com

            docker pull $ECR_URI
            docker run --rm --env-file /app/.env $ECR_URI npx prisma migrate deploy

            docker stop myapp-backend-dev || true
            docker rm myapp-backend-dev || true

            docker run -d \
              --name myapp-backend-dev \
              --restart unless-stopped \
              --env-file /app/.env \
              -p 3000:3000 \
              $ECR_URI

            docker image prune -f
            sleep 8
            curl -f http://localhost:3000/health || exit 1
Add DEV_EC2_HOST to GitHub repository secrets (the dev Elastic IP). All other secrets are shared with the prod workflow.
Step 8 — Frontend Dev Branch on Amplify
The frontend is hosted on AWS Amplify. Adding a dev branch is a one-step operation inside the existing Amplify app — no new app needed.
In the Amplify Console:
- Hosting → Connect branch → select
dev - App settings → Environment variables → add
NEXT_PUBLIC_API_URL = https://api-dev.yourapp.com, scoped to thedevbranch only - Hosting → Custom domains → yourapp.com → Manage subdomains → add subdomain
dev→ branchdev
Because the domain is managed in Route 53 in the same AWS account, Amplify provisions the SSL certificate and creates the CNAME record automatically — no manual DNS work.
Scope the environment variable to the devbranch specifically, not "All branches". If set globally, the prod Amplify build also picks it up and your production frontend starts hitting the dev API.
Verification
After the first GitHub Actions deploy completes, verify both ends are live:
# Backend health check
curl https://api-dev.yourapp.com/health
# {"status":"OK","timestamp":"2026-01-15T12:00:00.000Z"}

# Frontend — open in browser
# https://dev.yourapp.com
Final State
Resource              Production              Dev
─────────────────────────────────────────────────────────────
EC2                   myapp-ec2             myapp-ec2-dev
RDS                   myapp-db (PG 15)      myapp-db-dev (PG 17.9)
S3                    myapp-uploads-prod    myapp-uploads-dev
ECR                   myapp-backend         myapp-backend-dev
Git branch            main                    dev
Backend domain        api.yourapp.com          api-dev.yourapp.com
Frontend              yourapp.com              dev.yourapp.com
Amplify branch        main                    dev
CI trigger            push to main            push to dev
The workflow going forward:
feature branch
    → PR → merge into dev
           → auto-deploys to dev.yourapp.com
                  → test
                       → PR → merge into main
                              → auto-deploys to yourapp.com
Cost Impact
Dev EC2 t3.micro: ~$8.50/month. Dev RDS t3.micro: ~$18/month. Total dev overhead: ~$27/month.
If cost is a concern, stop both resources when not actively developing — they won't auto-deploy while stopped, but data persists and they restart in seconds.